Setting the Pi, OLED screen, and pipeline
Introduction
The following section of the tutorial focuses on setting up the Raspberry Pi, OLED screen, and pipeline for the BeetleboxCI platform. It covers the necessary steps to configure the Raspberry Pi, connect to the OLED screen, create a GitHub repository, upload SSH keys as artifacts, register the Raspberry Pi device with BeetleboxCI, and create a pipeline in BeetleboxCI. By following these steps, you will be able to establish a CI flow for your Raspberry Pi project. Let's dive into the details!
Prerequisites
- Get BeetleboxCI for free here! This tutorial will be referring to the machine that BeetleboxCI is installed on as a server, but BeetleboxCI can easily run on just a laptop.
- A Git Repository provider. You will use GitHub for this tutorial. BeetleboxCI does support a range of different Git Repository providers, which you can find here.
- Make sure that the Git Repo provider is linked to your BeetleboxCI account.
- Make sure to have Git installed on your computer as well.
- A Raspberry Pi. For this, you will be using a Raspberry Pi 4. However, other Pis will also work with this tutorial.
- An OLED screen. In this tutorial, you will be using an SSD1306 OLED screen. You can use other screens for this tutorial, but the drivers and code will need to be modified slightly.
- Breadboard and wires. You will need to connect your Raspberry Pi to your OLED screen.
Setting up the Pi, OLED screen and pipeline
Setting up the Raspberry Pi
Follow the instructions from the official Raspberry Pi tutorial on how to setup the OS using the Raspberry PI imager.
On OS customization, make sure to connect to Wi-Fi if you are not using an ethernet cable.
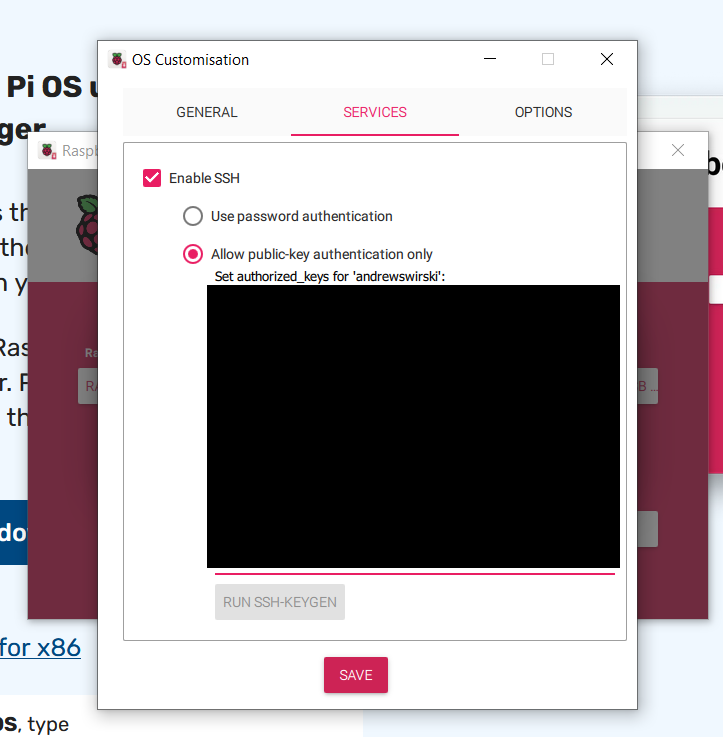
Under services, ensure that Enable SSH is ticked and that Allow public-key authentication only is also ticked. If you have a key saved to id_rsa, it will automatically use that. Otherwise, you can generate a new key pair and ensure they are saved to ~/.ssh/id_rsa.
Wiring up the Pi to the OLED
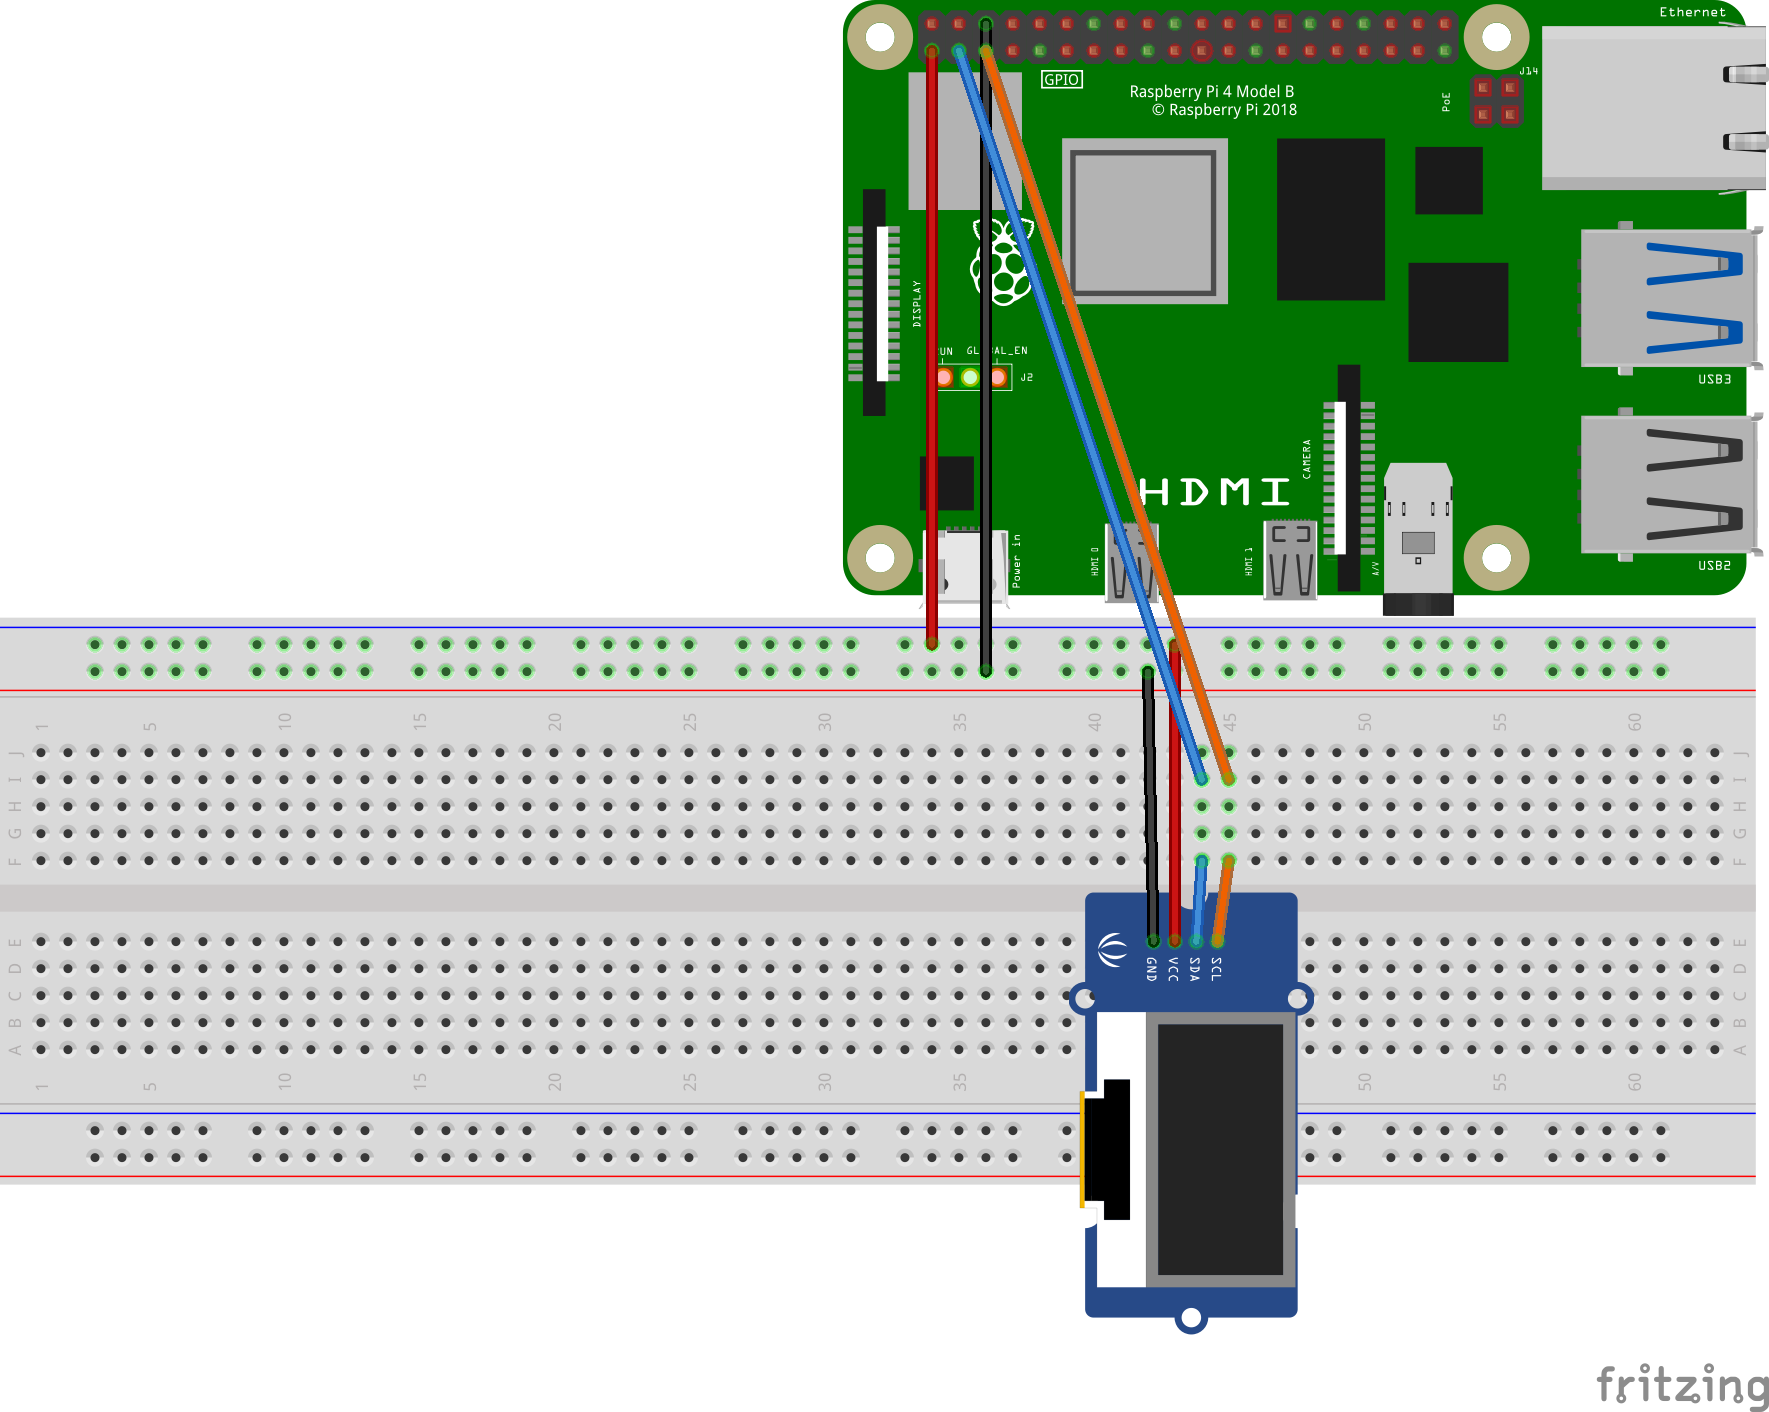
To connect the Pi to the OLED screen the following pins were connected:
- Pin 1 (3V3) -> VCC
- Pin 3 (GPIO 2 (SDA)) -> SDA
- Pin 5 (GPIO 3 (SCL)) -> SCL
- Pin 6 (GND) -> GND
You can follow the diagram as below:
Connecting to the Pi
Now you need to make sure the Pi is responding over SSH and that youy can get a signal out of the OLED screen.
- Ping the Raspberry Pi and save the address.
ping raspberrypi.local - Start an SSH agent:
eval "$(ssh-agent -s)" - Make sure to add your keys:
ssh-add ~/.ssh/id_rsa - Connect to your device:
ssh <your-username>@<your-address>
Checking your connection to the OLED screen
In this section, you will ensure that your OLED is responding over I2C.
- You should now be logged into your Raspberry Pi. The I2C is disabled by default and needs to be activated from the config:
sudo raspi-config - In the blue screen that will appear, select the
Interfacing optionsand then selectYesto theI2C option. Press enter and ok. - Reboot the Pi:
sudo reboot - Download the following libraries:
sudo apt-get install i2c-tools - Now check on the I2C bus:
sudo i2cdetect -y 1You should see an output like this:
     0  1  2  3  4  5  6  7  8  9  a  b  c  d  e  f
00:                         -- -- -- -- -- -- -- --
10: -- -- -- -- -- -- -- -- -- -- -- -- -- -- -- --
20: -- -- -- -- -- -- -- -- -- -- -- -- -- -- -- --
30: -- -- -- -- -- -- -- -- -- -- -- -- 3c -- -- --
40: -- -- -- -- -- -- -- -- -- -- -- -- -- -- -- --
50: -- -- -- -- -- -- -- -- -- -- -- -- -- -- -- --
60: -- -- -- -- -- -- -- -- -- -- -- -- -- -- -- --
This indicates that a device has been detected with an address of 0x3c, which is the default hex address.
Create a GitHub repository
Now you have your Pi and OLED responding, you can start creating a CI flow which first begins with creating a Git repo.
- Log in to GitHub and create a new repository. Make sure to intialise it with a .gitignore for Python.
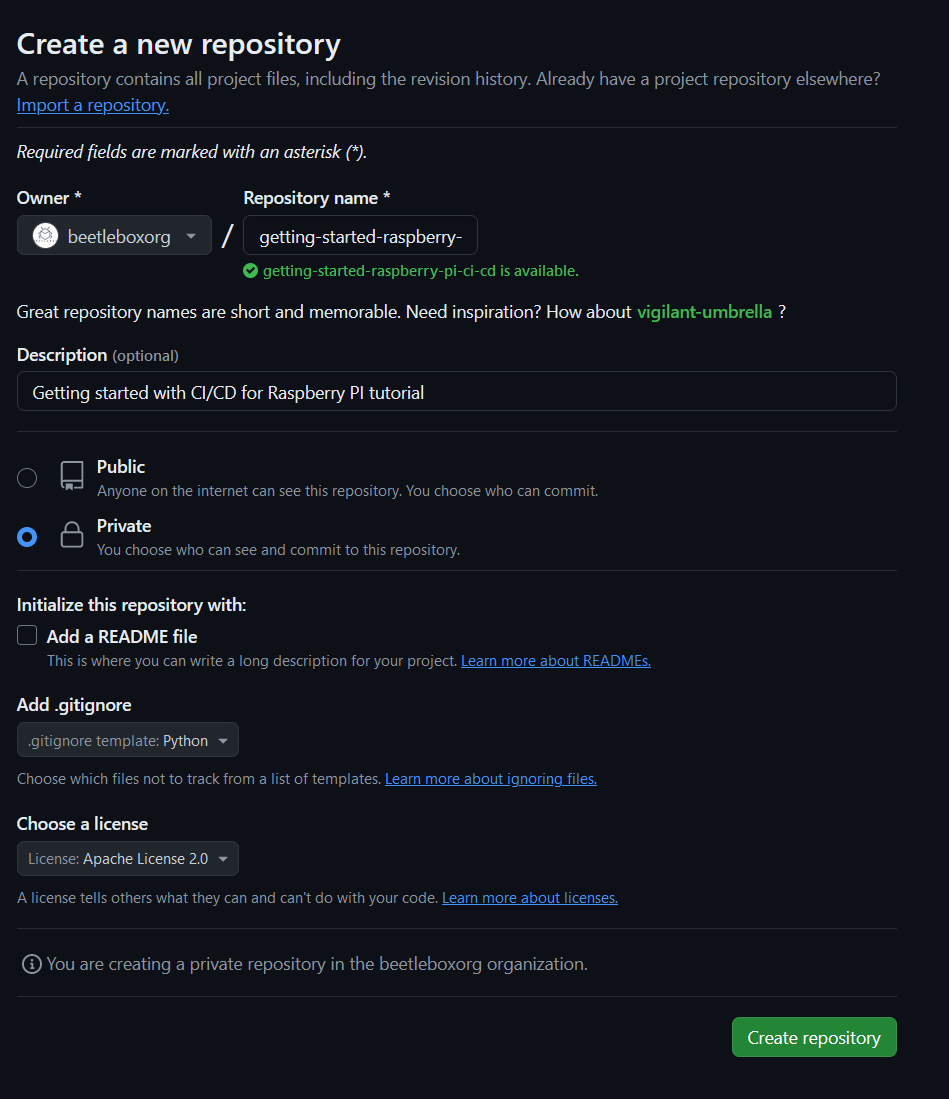
- Clone your new repository by selecting the green
<> Codebutton on the right hand side and following the instructions.
Upload keys as artifacts
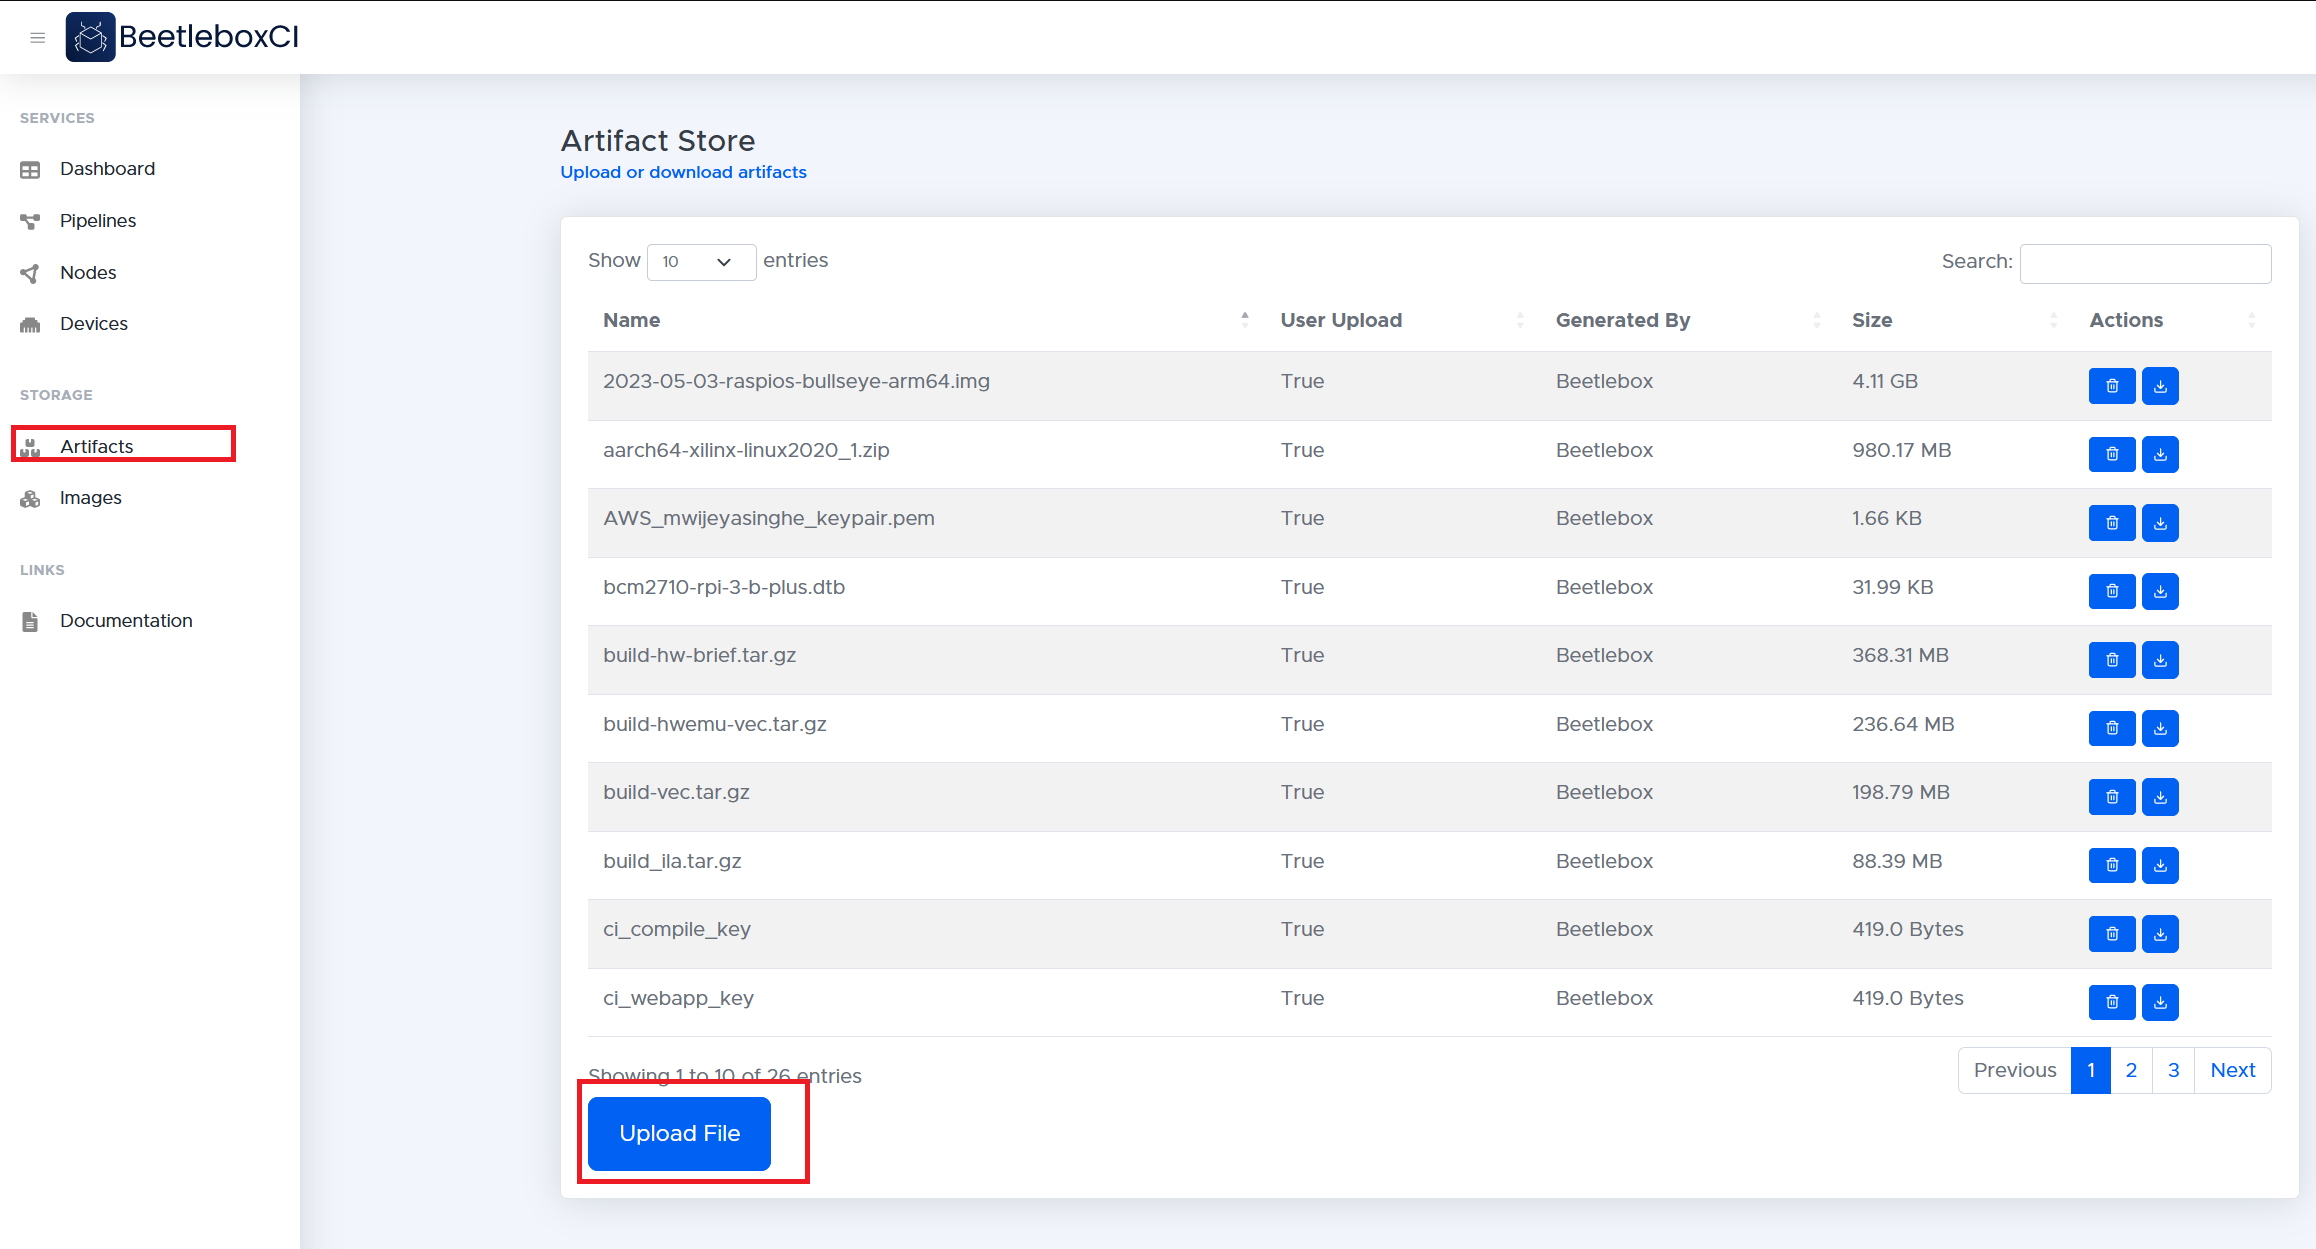
You need to upload the ssh keys as artifacts to give BeetleboxCI access to the Raspberry Pi:
- Select
Artifactson the left-hand column and then selectUpload File. - On the
File Uploadpage, selectBrowseand find~/.ssh/id_rsa. - Upload the file.
Creating a Raspberry Pi device
In this section, you will be registering your device with BeetleboxCI.
- On the BeetleboxCI website, click the
Devicespage on the left hand column. - At the bottom of the page, select
Register Device. - Copy and paste the following code in. Make sure to substitute in your values:
devices:
 raspberry-pi-4:
  connection: ssh -o StrictHostKeyChecking=no <username>@<raspberry-pi-address>
  prompt: "$"
- Click
Saveon the right-hand side.
Creating your pipeline in BeetleboxCI
You will now connect your git repo to BeetleboxCI. If you haven't already, now is the right time to link your GitHub account with BeetleboxCI.
- On the BeetleboxCI website, click the
Pipelinespage on the left hand column. - On the
Pipelinespage, clickCreate Pipelineat the bottom of the screen. - Find your repository on the list and select
Create Pipeline. - You will be taken back to the pipelines page where a warning will flash up if you want to create a config file. Click
Yesand then select themainbranch. - On the config page, select
Notoif you would like to use a template config file. - Copy and paste in the following code:
runners:
 ubuntu-runner:
  image: public.ecr.aws/y2s4f3y9/ubuntu-generic:latest

jobs:
  check-i2c-connection:
    runner: ubuntu-runner
    device: raspberry-pi-4
    input:
      artifact:
        - id_rsa
    steps:
      - run:
          name: Setup SSH keys
          command: |
            mkdir ~/.ssh
            cp ./id_rsa ~/.ssh/id_rsa
            chmod 600 ~/.ssh/id_rsa
            eval "$(ssh-agent -s)"
            ssh-add ~/.ssh/id_rsa
      - run:
          name: Set i2c
          on-device: True
          command: |
            sudo raspi-config nonint do_i2c 0
      - run:
          name: Install i2c
          on-device: True
          command: |
            sudo apt-get install i2c-tools
      - run:
          name: Reboot
          on-device: True
          command: |
            sudo reboot
      - run:
          name: Wait for reboot
          command: sleep 5
      - run:
          name: Check i2c connection
          on-device: True
          command: |
            sudo i2cdetect -y 1
          fail: "Error"

workflows:
  getting-started-rasp-pi:
    jobs:
      - check-i2c-connection
- Click
Save & Commiton the right-hand side. - This will take you back to the pipeline page. Click the button with the play symbol on it on right-hand side and run the pipeline.
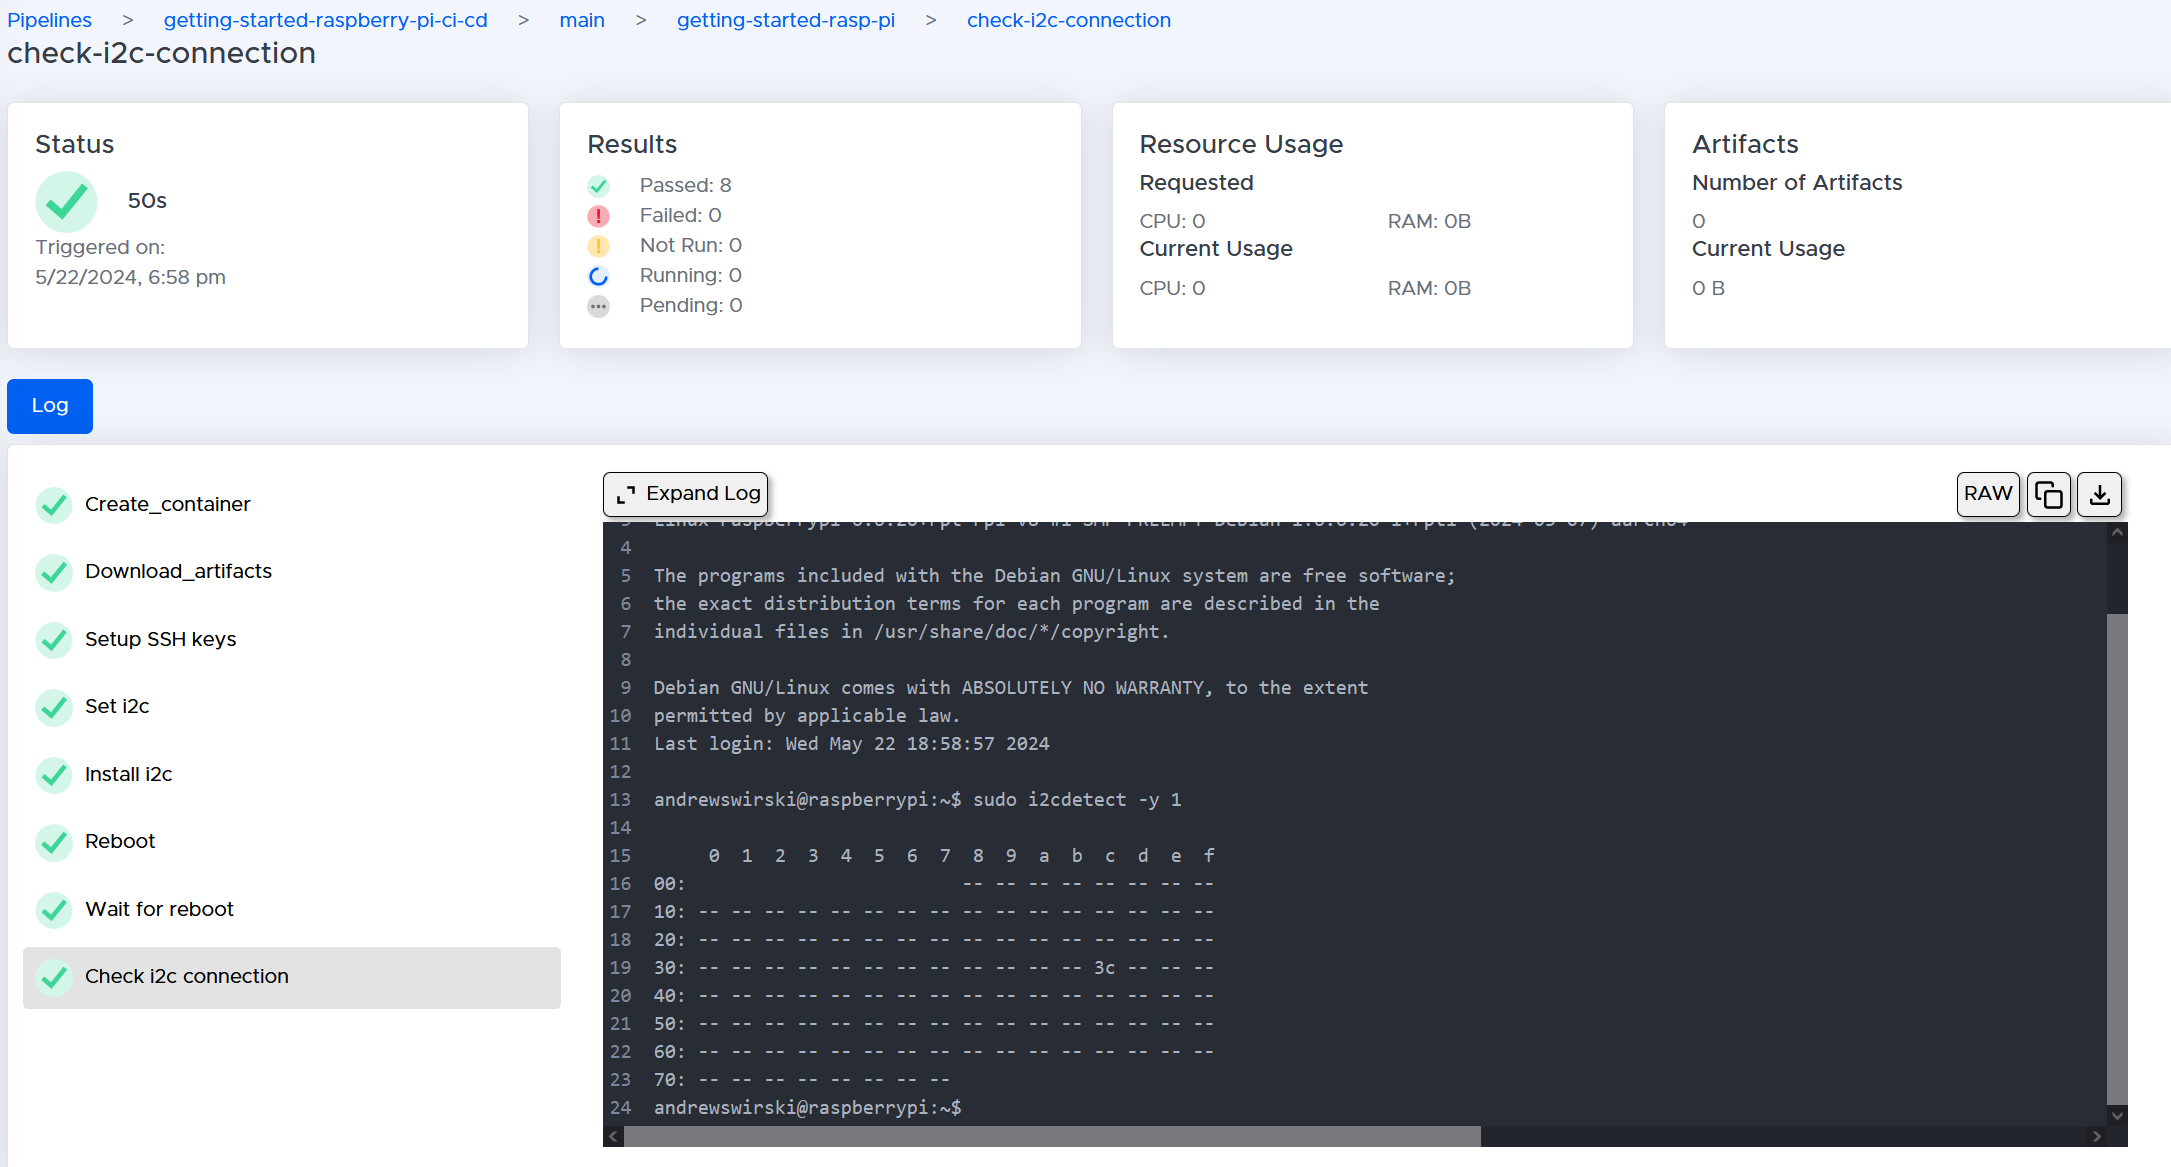
- As the pipeline runs make sure to check out the
check-i2c-connectionpage. If it is finished, the last stepCheck i2c connectionshould show:
/mnt/beetleboxci/nfs/efs-mount-point/configworkers/00e36cfd-8083-406b-a501-3155c742ce31/git_repos_PEN21/main/command/getting-started-rasp-pi/check-i2c-connection/step8c1ed04a-124f-4750-8edd-6aab4920ce19.expect
spawn ssh -o StrictHostKeyChecking=no andrewswirski@192.168.1.95
Linux raspberrypi 6.6.20+rpt-rpi-v8 #1 SMP PREEMPT Debian 1:6.6.20-1+rpt1 (2024-03-07) aarch64

The programs included with the Debian GNU/Linux system are free software;
the exact distribution terms for each program are described in the
individual files in /usr/share/doc/*/copyright.

Debian GNU/Linux comes with ABSOLUTELY NO WARRANTY, to the extent
permitted by applicable law.
Last login: Wed May 22 18:58:57 2024

andrewswirski@raspberrypi:~$ sudo i2cdetect -y 1

     0  1  2  3  4  5  6  7  8  9  a  b  c  d  e  f
00:                         -- -- -- -- -- -- -- --
10: -- -- -- -- -- -- -- -- -- -- -- -- -- -- -- --
20: -- -- -- -- -- -- -- -- -- -- -- -- -- -- -- --
30: -- -- -- -- -- -- -- -- -- -- -- -- 3c -- -- --
40: -- -- -- -- -- -- -- -- -- -- -- -- -- -- -- --
50: -- -- -- -- -- -- -- -- -- -- -- -- -- -- -- --
60: -- -- -- -- -- -- -- -- -- -- -- -- -- -- -- --
70: -- -- -- -- -- -- -- --
andrewswirski@raspberrypi:~$
Explaining the pipeline config
The first place to start writing a config file is the workflows.
workflows:
  getting-started-rasp-pi:
    jobs:
      - check-i2c-connection
Every pipeline breaks down into a series of workflows. In this case you have a single workflow called getting-started-rasp-pi. These workflows are made of several independent jobs. Your singular workflow has one job called check-i2c-connection.
jobs:
  check-i2c-connection:
    runner: ubuntu-runner
You declare any jobs in the jobs section. Every job runs in an independent execution environment known as a runner and if there are multiple jobs, they will all launch in parallel with one another unless specified not to. You need to declare what sort of runner, you want to use. Here you use the ubuntu-runner.
runners:
 ubuntu-runner:
  image: public.ecr.aws/y2s4f3y9/ubuntu-generic:latest
The ubuntu runner is then declared in the runners section. It uses the a generic ubuntu image from Amazon that is publicly available. An image is a snapshot in time of a container, so in this case someone has set up a basic version of Ubuntu before generating an image of that.
jobs:
  check-i2c-connection:
    runner: ubuntu-runner
    device: raspberry-pi-4
    input:
      artifact:
        - id_rsa
If you look back to the check-i2c-connection you will see the device keyword. This specifies that this job is to connect to the raspberry-pi-4 device that you declared earlier. You also need to upload your key to the job. To do this, you specify id_rsa as an input artifact. This downloads it to the runner available for use.
steps:
  - run:
      name: Setup SSH keys
      command: |
        mkdir ~/.ssh
        cp ./id_rsa ~/.ssh/id_rsa
        chmod 600 ~/.ssh/id_rsa
        eval "$(ssh-agent -s)"
        ssh-add ~/.ssh/id_rsa
You then declare what commands need to run on this job as a series of steps. The first step we have is called Setup SSH keys which takes that id_rsa, you downloaded and prepares it for use as a SSH key.
- run:
    name: Set i2c
    on-device: True
    command: |
      sudo raspi-config nonint do_i2c 0
The raspberry pi needs to be configured to allow the use of the i2c, which is turned off by default. To do this, you need to execute the sudo raspi-config nonint do_i2c 0 on the device itself. To specify that the command needs to run on device, you set on-device to True.
- run:
    name: Install i2c
    on-device: True
    command: |
      sudo apt-get install i2c-tools
- run:
    name: Reboot
    on-device: True
    command: |
      sudo reboot
- run:
    name: Wait for reboot
    command: sleep 5
These next few steps install the i2c-tools on the Pi and then reboots the Pi for the config changes to take effect. On the runner level, you then wait for five seconds using sleep 5 before attempting to run more commands on the device.
- run:
    name: Check i2c connection
    on-device: True
    command: |
      sudo i2cdetect -y 1
    fail: "Error"
Finally, you have the Check i2c connection step, which runs i2c detect to generate the graph to see if the OLED screen is properly communicating. This step also uses a keyword called fail. This command takes a certain string as input, in this case Error. It will then search the log generated for that keyword and will flag that a failure has occurred.
Summary
In this section, you have successfully:
- Set up your raspberry pi
- Wired it to an OLED screen
- Created a GitHub repository
- Learned about using artifacts
- Learned about setting up devices
- Created a pipeline that could check a i2c connection
In the next section, you will look at programming the OLED screen to display some text.