GitHub
Overview
BeetleboxCI supports full GitHub integration, which is the recommended method for connecting GitHub repositories. GitHub pipelines can also be created manually. This requires users to provide the URL of GitHub repositories, alongside credentials to access those repositories if needed. Please note that pull requests cannot be detected on repositories that are added using the manual method.
Integrating BeetleboxCI with GitHub (recommended method)
Creating a GitHub App
The first stage is to create a GitHub App for BeetleboxCI to connect to your Github account. You will need to have GitHub admin permissions for your organisation to do this.
On the GitHub website, go to your GitHub
Settingspage and selectDeveloper Settings. If you are part of an organisation, ensure you are on the organization's context and not your personal context.In
Developer settings, please selectGitHub Apps. This should open a new page and in this page please selectNew GitHub App.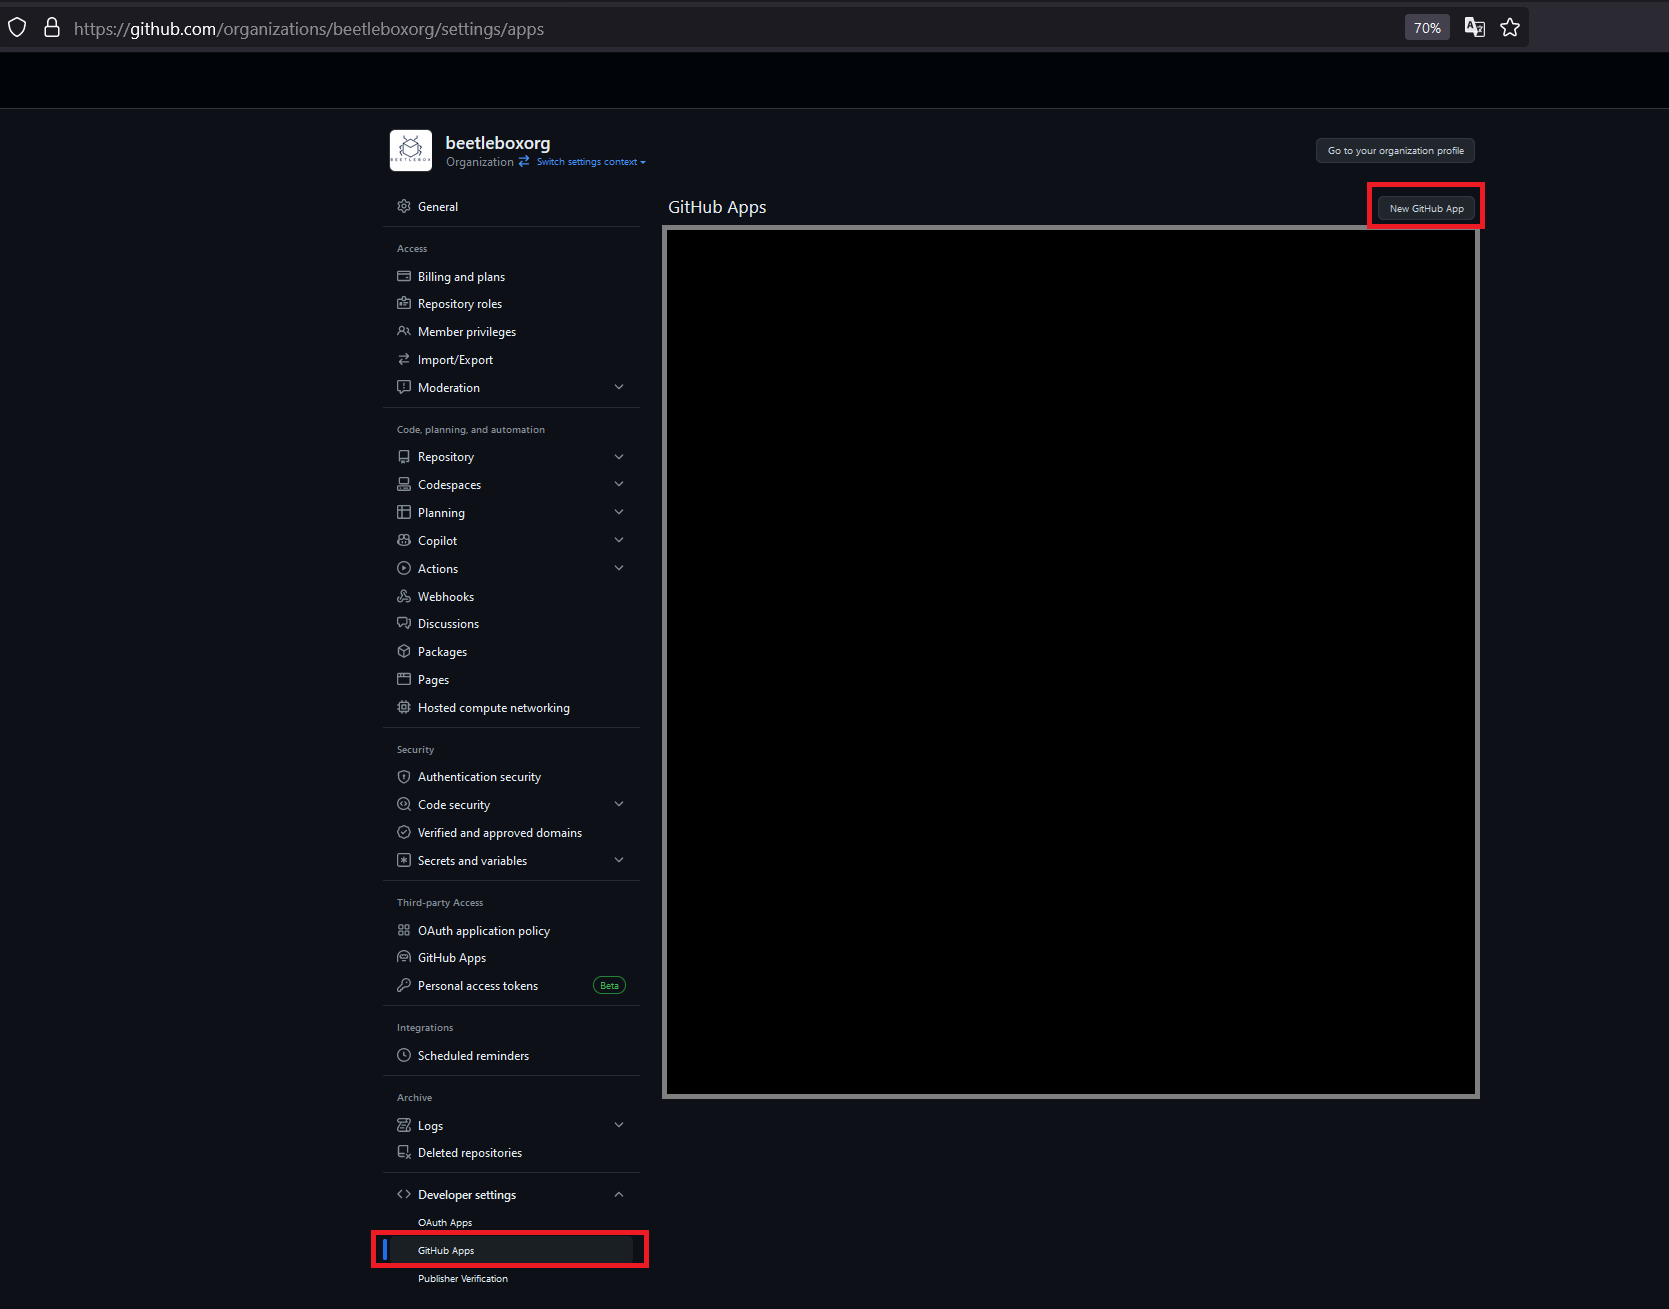
In the
Register new GitHub App, provide a name for your GitHub App underGitHub App name.For
Homepage URLprovide the URL of the BeetleboxCI server.Under
Identifying and authorizing usersprovide the following forCallback URL:http://<your_server_url>/select_organisationTick
Request user authorization (OAuth) during installation.Under
Webhookprovide the following forWebhook URL:
http://<your_server_url>githubapp/receive/
- Under
Permissionsyou will need to fill in three sections:
Under Repository permissions select the following:
Administration-Access: Read and writeCommit statuses-Access: Read and writeDeployments-Access: Read and writeMetadata-Access: Read-onlyPull requests-Access: Read and writeWebhooks-Access: Read and write
Under Organization permissions select the following:
Administration-Access: Read and write
Under Account permissions select the following:
Email addresses-Access: Read-onlyGit SSH keys-Access: Read and write
In total six repository permissions, one organization permission and two account permissions should be selected.
- Afterwards select
Create GitHub Appat the bottom of the page. - If registration was successful, you should recieve the following banner
Registration successful. You must generate a private key in order to install your GitHub App. Click the link and generate a private key. This will download a private key that must be kept secure. You will need this private key for later.
Link your GitHub App to BeetleboxCI
Now that you have created the app, it is time to link to BeetleboxCI.
Click on your profile on the right hand side of the BeetleboxCI webapp and select the
Settingsbutton.In the
Settingstab selectLinked Organisationsand then theGithubtab. UnderGitHub Integration Settings, fill in the following information:App Id- the App ID that can be found in the GitHub App settings page.Client Id- the Client ID that can be found in the GitHub App settings page.Public link- the public link to your GitHub app which will be in the format:https://github.com/apps/<your_app_name>Beetlebox URL- the URL of your Beetlebox installation.Client Secret- For client secret, you need to generate a secret by selectingGenerate a new client secreton the GitHub App settings page. Copy and save the secret toClient Secret.Private key- Paste in the private key that you downloaded earlier.
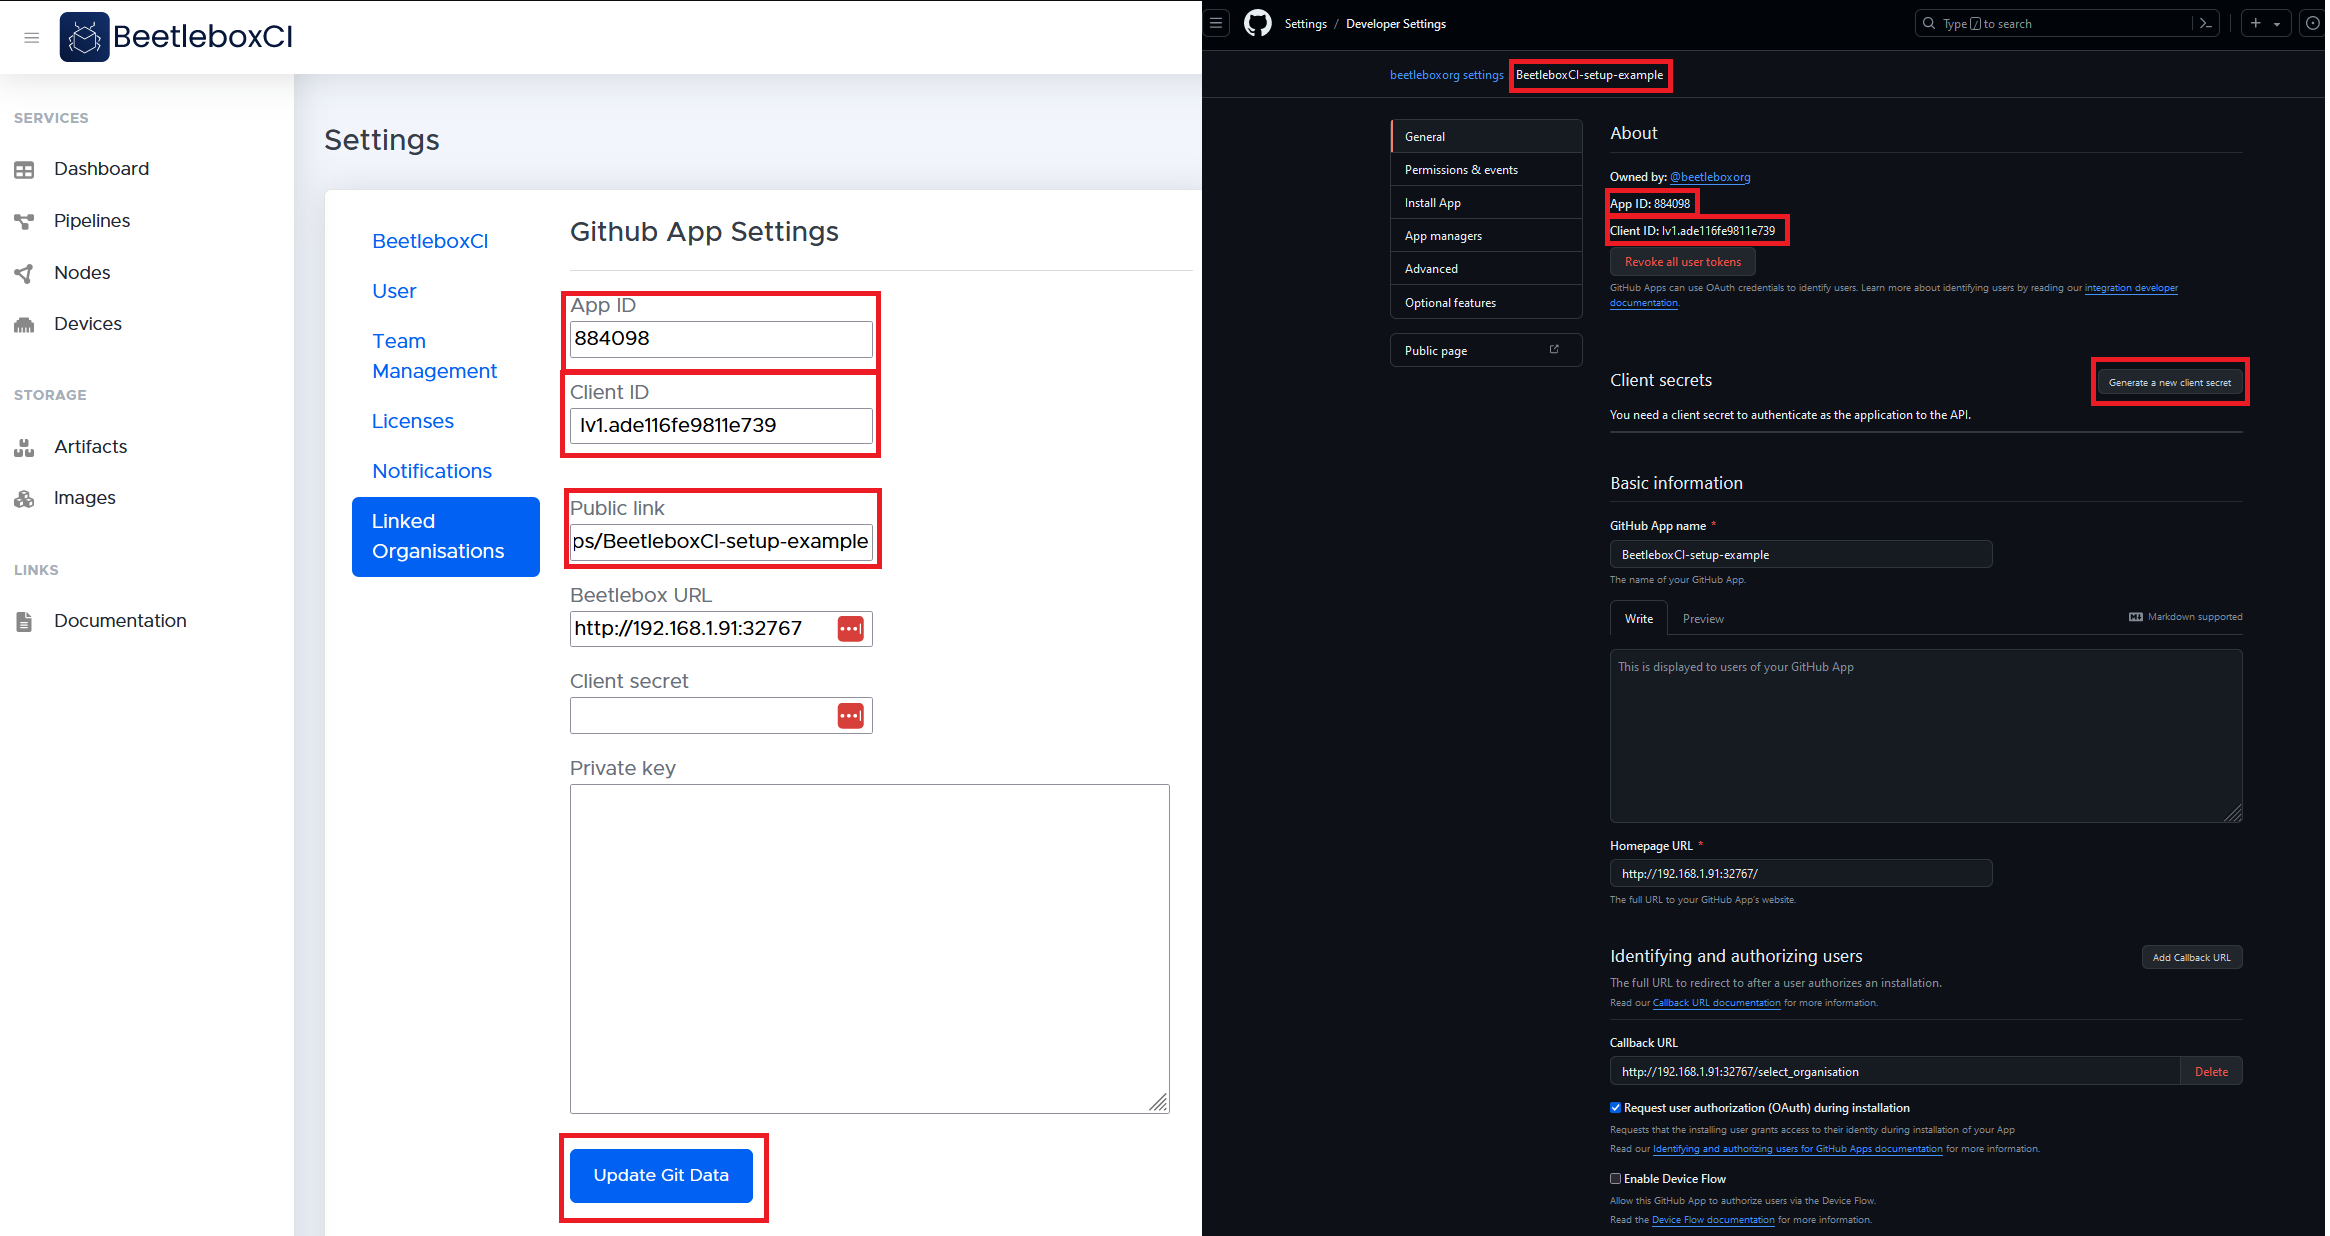
Once finished, select
Update Git Data.On the same BeetleboxCI page, select
Configure Organisations. This will open a GitHub webpage asking for permissions, ensureAll repositoriesis selected and then clickInstall & Authorize
This will redirect you back to BeetleboxCI. Make sure your organisation is selected and click
Next.
This will redirect you back to the settings page. If everything has been successful, you should see your organization listed under
Linked GitHub Organisations.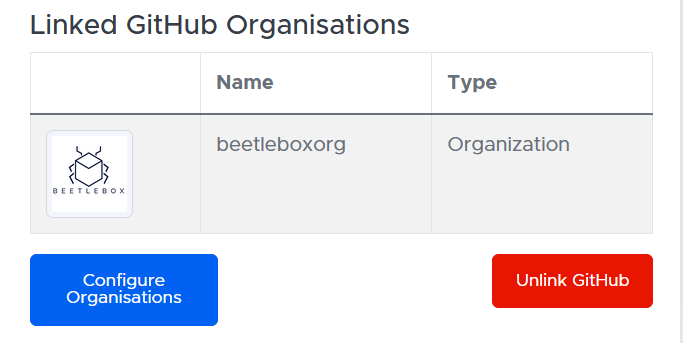
Now anyone within your BeetleboxCI installation will now be able to add repositories directly from your GitHub organisation.
Manually Adding a Public Github Repository to BeetleboxCI
- On the pipelines page of BeetleboxCI in your browser: If you do not already have any pipelines in BeetleboxCI, click 'Create your first pipeline'. Otherwise, click "Create Pipeline" at the bottom of the pipelines page.
- In the following screen, fill in the following:
Project Name: [Name of your Github repository]
Repository URL:
https://github.com/<username>/<repo_name>.gitThe authentication settings can be left blank since they are not necessary when adding a public repository.
- Click proceed. You will now be redirected to the pipelines page where you can see the project that you just created.
Manually Adding a Private Github Repository to BeetleboxCI
When you add a project from a private repository to BeetleboxCI, you will need to provide either:
- A Github username and personal access token (https authentication)
- A private SSH key to BeetleboxCI (plus adding the public key as a deploy key to the Github repository)
You can find more information further down this page about how to create personal access tokens and set up SSH keys.
- On the pipelines page of BeetleboxCI in your browser: If you do not already have any pipelines in BeetleboxCI, click 'Create your first pipeline'. Otherwise, click "Create Pipeline" at the bottom of the pipelines page.
- In the following screen, fill in the following:
- Project Name: [Name of your Github repository]
- Repository URL:
https://github.com/<username>/<repo_name>.gitorgit@github.com:<username>/<repo_name>.git
- Also fill in either the "Authentication settings" section OR the "SSH Authentication" section. You will need need to use username and token authentication if you chose the https URL or SSH authentication if you chose the SSH URL.
- Authentication Settings — Username:
<Github username> - Authentication Settings — Password:
<Github personal access token> - SSH Authentication — SSH private key
- Click proceed. You will now be redirected to the pipelines page where you can see the project that you just created.
Create a Github Personal Access Token
To generate a personal access token for Github, you can follow this link. This personal access token can be used when creating pipelines in BeetleboxCI. When creating the token, you can specify the exact permissions this token will have.
SSH Keys
Generate an SSH Key
As an alternative to your username and a personal access token, you can generate an SSH key to authenticate access to private git repositories (given that the public key is added either to your Github account or just as a deploy key to the repository).
These commands are identical for both Windows and Linux.
Open a terminal in Linux or Powershell in Windows.
Input the command below, replacing the email address with the email that you have registered on Github:
ssh-keygen -t ed25519 -C "your_email@example.com"
- You will be prompted to enter a location to save the key. Press Enter to accept the default location which is shown.
- When prompted, enter a secure passphrase.
- Now two files will have been generated, and you can browse to the location where you saved them. The file ending in .pub contains the public key which will need to be added as a deploy key either to you Github account or just to a Github repository. The private key can be added during the pipeline creation process in BeetleboxCI, as a means of authentication.
More information generating SSH keys for Github can be found on this link.
Add a public key (deploy key) to a Github repository
This will provide authentication for just this repository.
Browse to the repository which you want to add the key to.
Click settings (if the settings option is not visible, then you do not have permissions to edit the settings of the repository)
In the left-hand sidebar, click Deploy keys.
Click Add deploy key on the top right.
Choose a title for the deploy key that helps to remember what it is for, and paste the public key from the file you generated earlier.
The public key will be similar to:
ssh-ed25529 M3AGUEr7YVcArc00zSx3WWfY0Kxkb4tNL3BE8020XRwcrE6MBtUXQsKHab3rZt4qSEF62Z user@example.comYou can optionally choose to allow write access, which will allow BeetleboxCI to perform pushes to the repository (at present, BeetleboxCI does not modify anything in your repository, but in future functionality of BeetleboxCI will be able to do this)
Click Add key.
More information can be found in the deploy keys section of this document.
Add a public key to your Github account
This will allow access to all the repositories which your account is able to access.
Log in to Github
In the top right hand corner of the web page, click your profile photo to show the drop-down menu and select the settings option.
Click SSH and GPG keys on the left hand sidebar.
Click New SSH key
Provide a title for the key, and choose the Key type as Authentication key.
Paste the public key into the Key field.
The public key will be similar to:
ssh-ed25529 M3AGUEr7YVcArc00zSx3WWfY0Kxkb4tNL3BE8020XRwcrE6MBtUXQsKHab3rZt4qSEF62Z user@example.comClick Add SSH key.
If prompted, enter your Github username and password.
More information about adding SSH keys to your account can be found this this document.